Vue 源码解读之二响应式数据原理

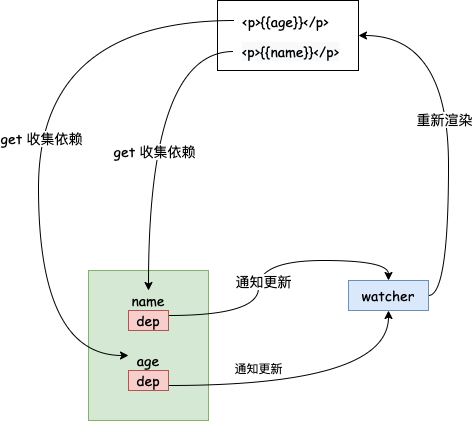
上把打了个酱油快速走读了一下首次渲染流程,这把我们玩个核心,来看看 Vue 中最经典的部分:响应式数据原理。啥都不说,我们先上图:

定义响应式数据

我们在初始化 Vue 的时候,会执行 initState(vm)

1
2
3
4
5
6
7
8
9
export function initState(vm: Component) {
...
if (opts.data) {
initData(vm)
} else {
observe((vm._data = {}), true /* asRootData */)
}
...
}

这里最重要的是 initData 这个方法:

1
2
3
4
5
6
function initData(vm: Component) {
let data = vm.$options.data
data = vm._data = typeof data === 'function' ? getData(data, vm) : data || {}
...
observe(data, true /* asRootData */)
}

这里也没什么特别的,关键是 observe(data, true /* asRootData */) 这一句:

1
2
3
4
5
6
7
8
9
10
11
12
13
14
15
16
17
18
19
20
21
export function observe(value: any, asRootData: ?boolean): Observer | void {
if (!isObject(value) || value instanceof VNode) {
return
}
let ob: Observer | void
if (hasOwn(value, '__ob__') && value.__ob__ instanceof Observer) {
ob = value.__ob__
} else if (
shouldObserve &&
!isServerRendering() &&
(Array.isArray(value) || isPlainObject(value)) &&
Object.isExtensible(value) &&
!value._isVue
) {
ob = new Observer(value)
}
if (asRootData && ob) {
ob.vmCount++
}
return ob
}

这里也只是通过传进来的 value 实例化了一个 Observer 对象:

1
2
3
4
5
6
7
8
9
10
11
12
13
14
15
16
17
18
19
20
21
22
23
24
25
26
27
28
29
30
31
32
33
34
35
36
37
38
39
40
export class Observer {
value: any
dep: Dep
vmCount: number // number of vms that has this object as root $data

constructor(value: any) {
this.value = value
this.dep = new Dep()
this.vmCount = 0
def(value, '__ob__', this)
if (Array.isArray(value)) {
const augment = hasProto ? protoAugment : copyAugment
augment(value, arrayMethods, arrayKeys)
this.observeArray(value)
} else {
this.walk(value)
}
}

/**
* Walk through each property and convert them into
* getter/setters. This method should only be called when
* value type is Object.
*/
walk(obj: Object) {
const keys = Object.keys(obj)
for (let i = 0; i < keys.length; i++) {
defineReactive(obj, keys[i])
}
}

/**
* Observe a list of Array items.
*/
observeArray(items: Array<any>) {
for (let i = 0, l = items.length; i < l; i++) {
observe(items[i])
}
}
}

这里分数组和对象分别进行了处理,我们先来看看 defineReactive

1
2
3
4
5
6
7
8
9
10
11
12
13
14
15
16
17
18
19
20
21
22
23
24
25
26
27
28
29
30
31
32
33
34
35
36
37
38
39
40
41
42
43
44
45
46
47
48
49
50
51
52
53
54
55
56
57
58
export function defineReactive(
obj: Object,
key: string,
val: any,
customSetter?: ?Function,
shallow?: boolean
) {
const dep = new Dep()

const property = Object.getOwnPropertyDescriptor(obj, key)
if (property && property.configurable === false) {
return
}

// cater for pre-defined getter/setters
const getter = property && property.get
const setter = property && property.set
if ((!getter || setter) && arguments.length === 2) {
val = obj[key]
}

let childOb = !shallow && observe(val)
Object.defineProperty(obj, key, {
enumerable: true,
configurable: true,
get: function reactiveGetter() {
const value = getter ? getter.call(obj) : val
if (Dep.target) {
dep.depend()
if (childOb) {
childOb.dep.depend()
if (Array.isArray(value)) {
dependArray(value)
}
}
}
return value
},
set: function reactiveSetter(newVal) {
const value = getter ? getter.call(obj) : val
/* eslint-disable no-self-compare */
if (newVal === value || (newVal !== newVal && value !== value)) {
return
}
/* eslint-enable no-self-compare */
if (process.env.NODE_ENV !== 'production' && customSetter) {
customSetter()
}
if (setter) {
setter.call(obj, newVal)
} else {
val = newVal
}
childOb = !shallow && observe(newVal)
dep.notify()
},
})
}

这里分别给数据定义了 getset 方法,执行 get 方法的时候会进行依赖收集。

依赖收集

我们看看依赖收集做了什么:

1
2
3
4
5
depend () {
if (Dep.target) {
Dep.target.addDep(this)
}
}

这里的 Dep.target 又是哪来的呢,其实它就是 Watcher 的实例。

1
2
3
4
5
6
7
8
9
10
11
12
13
14
15
16
17
18
19
20
21
22
23
24
25
26
27
28
29
30
31
32
33
34
35
36
37
38
39
40
41
42
43
44
45
46
47
48
49
50
51
52
53
54
55
56
57
58

export default class Watcher {
...

constructor (
vm: Component,
expOrFn: string | Function,
cb: Function,
options?: ?Object,
isRenderWatcher?: boolean
) {
...
if (typeof expOrFn === 'function') {
this.getter = expOrFn
} else {
this.getter = parsePath(expOrFn)
if (!this.getter) {
this.getter = function () {}
process.env.NODE_ENV !== 'production' && warn(
`Failed watching path: "${expOrFn}" ` +
'Watcher only accepts simple dot-delimited paths. ' +
'For full control, use a function instead.',
vm
)
}
}
this.value = this.lazy
? undefined
: this.get()
}

/**
* Evaluate the getter, and re-collect dependencies.
*/
get () {
pushTarget(this)
let value
const vm = this.vm
try {
value = this.getter.call(vm, vm)
} catch (e) {
if (this.user) {
handleError(e, vm, `getter for watcher "${this.expression}"`)
} else {
throw e
}
} finally {
// "touch" every property so they are all tracked as
// dependencies for deep watching
if (this.deep) {
traverse(value)
}
popTarget()
this.cleanupDeps()
}
return value
}
...

上一章说了,在组件 $mount 的时候会初始化一个 Wathcer
Watcher 初始化的时候会执行 this.getpushTarget 将前Dep.target 设置为当前的 Watcher。同时,执行 this.get 的时候,还会调用 this.getter.call(vm, vm),这个 getter 就是构造函数中传递进来的 expOrFn,它是啥呢,它就是:

1
2
3
updateComponent = () => {
vm._update(vm._render(), hydrating)
}

其中 vm._render 执行的时候会对数据进行取值操作,从而触发 defineProperty 中的 get 方法。

触发更新

当数据被赋值的时候会触发 set 方法,调用 dep.notify(),最后会调用 Watcher 类中的:

1
2
3
4
5
6
7
8
9
10
update () {
/* istanbul ignore else */
if (this.lazy) {
this.dirty = true
} else if (this.sync) {
this.run()
} else {
queueWatcher(this)
}
}

queueWatcher

1
2
3
4
5
6
7
8
9
10
11
12
13
14
15
16
17
18
19
20
21
22
23
export function queueWatcher(watcher: Watcher) {
const id = watcher.id
// 相同的 watcher 只入队一次
if (has[id] == null) {
has[id] = true
if (!flushing) {
queue.push(watcher)
} else {
// if already flushing, splice the watcher based on its id
// if already past its id, it will be run next immediately.
let i = queue.length - 1
while (i > index && queue[i].id > watcher.id) {
i--
}
queue.splice(i + 1, 0, watcher)
}
// 一次更新只开启一个任务
if (!waiting) {
waiting = true
nextTick(flushSchedulerQueue)
}
}
}

我们先看看 flushSchedulerQueue

1
2
3
4
5
6
7
8
9
10
11
12
13
14
15
16
17
18
19
20
21
22
23
24
25
26
27
28
29
30
31
32
33
34
35
36
37
38
39
40
41
42
43
44
45
46
47
48
49
50
51
function flushSchedulerQueue() {
flushing = true
let watcher, id

// Sort queue before flush.
// This ensures that:
// 1. Components are updated from parent to child. (because parent is always
// created before the child)
// 2. A component's user watchers are run before its render watcher (because
// user watchers are created before the render watcher)
// 3. If a component is destroyed during a parent component's watcher run,
// its watchers can be skipped.
queue.sort((a, b) => a.id - b.id)

// do not cache length because more watchers might be pushed
// as we run existing watchers
for (index = 0; index < queue.length; index++) {
watcher = queue[index]
if (watcher.before) {
watcher.before()
}
id = watcher.id
has[id] = null
watcher.run()
// 用户有可能在 watch 里面给响应式数据赋值从而导致无限循环
// in dev build, check and stop circular updates.
if (process.env.NODE_ENV !== 'production' && has[id] != null) {
circular[id] = (circular[id] || 0) + 1
if (circular[id] > MAX_UPDATE_COUNT) {
warn(
'You may have an infinite update loop ' +
(watcher.user
? `in watcher with expression "${watcher.expression}"`
: `in a component render function.`),
watcher.vm
)
break
}
}
}

// keep copies of post queues before resetting state
const activatedQueue = activatedChildren.slice()
const updatedQueue = queue.slice()

resetSchedulerState()

// call component updated and activated hooks
callActivatedHooks(activatedQueue)
callUpdatedHooks(updatedQueue)
}

其他更多细节可以参考我们自己 DIY 的响应式系统

这里我们看看数组是怎么处理的。

数组处理

1
2
3
4
5
6
7
8
9
10
if (Array.isArray(value)) {
// 覆盖数组实例的原型
if (hasProto) {
protoAugment(value, arrayMethods)
} else {
copyAugment(value, arrayMethods, arrayKeys)
}
this.observeArray(value)
} else {
...

我们先看看 protoAugment

1
2
3
4
5
function protoAugment(target, src: Object) {
/* eslint-disable no-proto */
target.__proto__ = src
/* eslint-enable no-proto */
}

看来还得看看 arrayMethods

1
2
3
4
5
6
7
8
9
10
11
12
13
14
15
16
17
18
19
20
21
22
23
24
25
26
27
28
29
30
31
32
33
34
35
36
37
38
39
40
41
42
43
44
import {def} from '../util/index'

const arrayProto = Array.prototype
// 继承除了 methodsToPatch 以外的其他属性或方法
export const arrayMethods = Object.create(arrayProto)

const methodsToPatch = [
'push',
'pop',
'shift',
'unshift',
'splice',
'sort',
'reverse',
]

/**
* Intercept mutating methods and emit events
*/
methodsToPatch.forEach(function (method) {
// cache original method
const original = arrayProto[method]
def(arrayMethods, method, function mutator(...args) {
// 数组方法的默认行为
const result = original.apply(this, args)

// 变更通知:获取小管家
const ob = this.__ob__
// 插入操作:会导致新元素进入,他们需要社会主义教育
let inserted
switch (method) {
case 'push':
case 'unshift':
inserted = args
break
case 'splice':
inserted = args.slice(2)
break
}
if (inserted) ob.observeArray(inserted)
ob.dep.notify()
return result
})
})

我们举例来说说这一串的操作是干了个啥:

1
[1, 2, 3] --__proto__--> arrayMethods --__proto__--> Array.prototype

其中 arrayMethods 对 7 个数组方法进行了包装,使得在对数进行操作的时候可以通知 Watcher 进行更新。这里的 ob.dep 是个啥呢。比如说 data 中有这样一个属性 arr: [1,2],在对 arr 进行依赖收集的时候有如下代码,这里的 childOb.dep 和上文的 ob.dep 是同一个对象。

1
2
3
4
5
6
7
8
...
dep.depend()
if (childOb) {
childOb.dep.depend()
if (Array.isArray(value)) {
dependArray(value)
}
}

具体来说,这里的 childOb 就是 [1,2] 这个对象经过 observe 返回后的 Observer 实例,它有 dep 属性。从这里可以看到它和 arr 拥有一样的依赖,即下面这两个操作都会触发通知相同的 Watcher 去更新:

1
2
3
4
// 1
this.arr = [3, 4]
// 2
this.arr.push(3)

computed 的处理

1
2
3
4
5
6
7
8
9
10
11
12
13
14
15
16
17
18
19
20
21
22
23
24
25
26
27
28
29
const computedWatcherOptions = {lazy: true}
function initComputed(vm: Component, computed: Object) {
// $flow-disable-line
const watchers = (vm._computedWatchers = Object.create(null))
// computed properties are just getters during SSR
const isSSR = isServerRendering()

for (const key in computed) {
const userDef = computed[key]
const getter = typeof userDef === 'function' ? userDef : userDef.get

if (!isSSR) {
// create internal watcher for the computed property.
watchers[key] = new Watcher(
vm,
getter || noop,
noop,
computedWatcherOptions
)
}

// component-defined computed properties are already defined on the
// component prototype. We only need to define computed properties defined
// at instantiation here.
if (!(key in vm)) {
defineComputed(vm, key, userDef)
}
}
}

这里遍历了 computed 里面的每一个属性,并且为每一个属性初始化了一个 Watcher 对象。这样,当我们在 computed 里面访问 data 里面的属性时,就可以收集到依赖了。注意到这里传入了 { lazy: true },我们看看会有什么效果:

1
2
3
4
5
this.dirty = this.lazy // for lazy watchers
...
this.value = this.lazy
? undefined
: this.get()

该属性仅仅是标记了当前数据是 “脏的”,并且不会立即求值。所谓 “脏的” 指的是当前值已经脏了,需要重新求值了,这个后面会再提到。

然后我们看看 defineComputed 做了啥:

1
2
3
4
5
6
7
8
9
10
11
12
13
14
15
16
export function defineComputed(
target: any,
key: string,
userDef: Object | Function
) {
// 不考虑服务端渲染,这里为 true
const shouldCache = !isServerRendering()
// 只看 computed 值为函数的情况
if (typeof userDef === 'function') {
sharedPropertyDefinition.get = shouldCache
? createComputedGetter(key)
: createGetterInvoker(userDef)
sharedPropertyDefinition.set = noop
}
Object.defineProperty(target, key, sharedPropertyDefinition)
}

这里跑到了 createComputedGetter 这个方法:

1
2
3
4
5
6
7
8
9
10
11
12
13
14
function createComputedGetter(key) {
return function computedGetter() {
const watcher = this._computedWatchers && this._computedWatchers[key]
if (watcher) {
if (watcher.dirty) {
watcher.evaluate()
}
if (Dep.target) {
watcher.depend()
}
return watcher.value
}
}
}

当我们第一次访问计算属性的时候会触发 get,由于 dirty 为 true,所以这里会走 watcher.evaluate 进行求值,并将 this.dirty 置为 false,这样下次再对 computed 进行求值的时候就不会执行 watcher.evaluate() 了,这样就实现了缓存功能。

1
2
3
4
evaluate () {
this.value = this.get()
this.dirty = false
}

而当 computed 依赖的数据变化的时候,会触发 Watchupdate

1
2
3
4
5
6
7
8
9
10
11
12
update () {
/* istanbul ignore else */
// computed
if (this.lazy) {
this.dirty = true
} else if (this.sync) {
this.run()
} else {
// 入队
queueWatcher(this)
}
}

这里仅仅是把 dirty 又重置为了 true 以使得下次对 computed 进行求值的时候重新执行 watcher.evaluate()

缓存部分说完了,我们来看看下面这一段代码做了什么:

1
2
3
if (Dep.target) {
watcher.depend()
}
1
2
3
4
5
6
depend () {
let i = this.deps.length
while (i--) {
this.deps[i].depend()
}
}

这里有点难理解,我们用一个例子来说明:

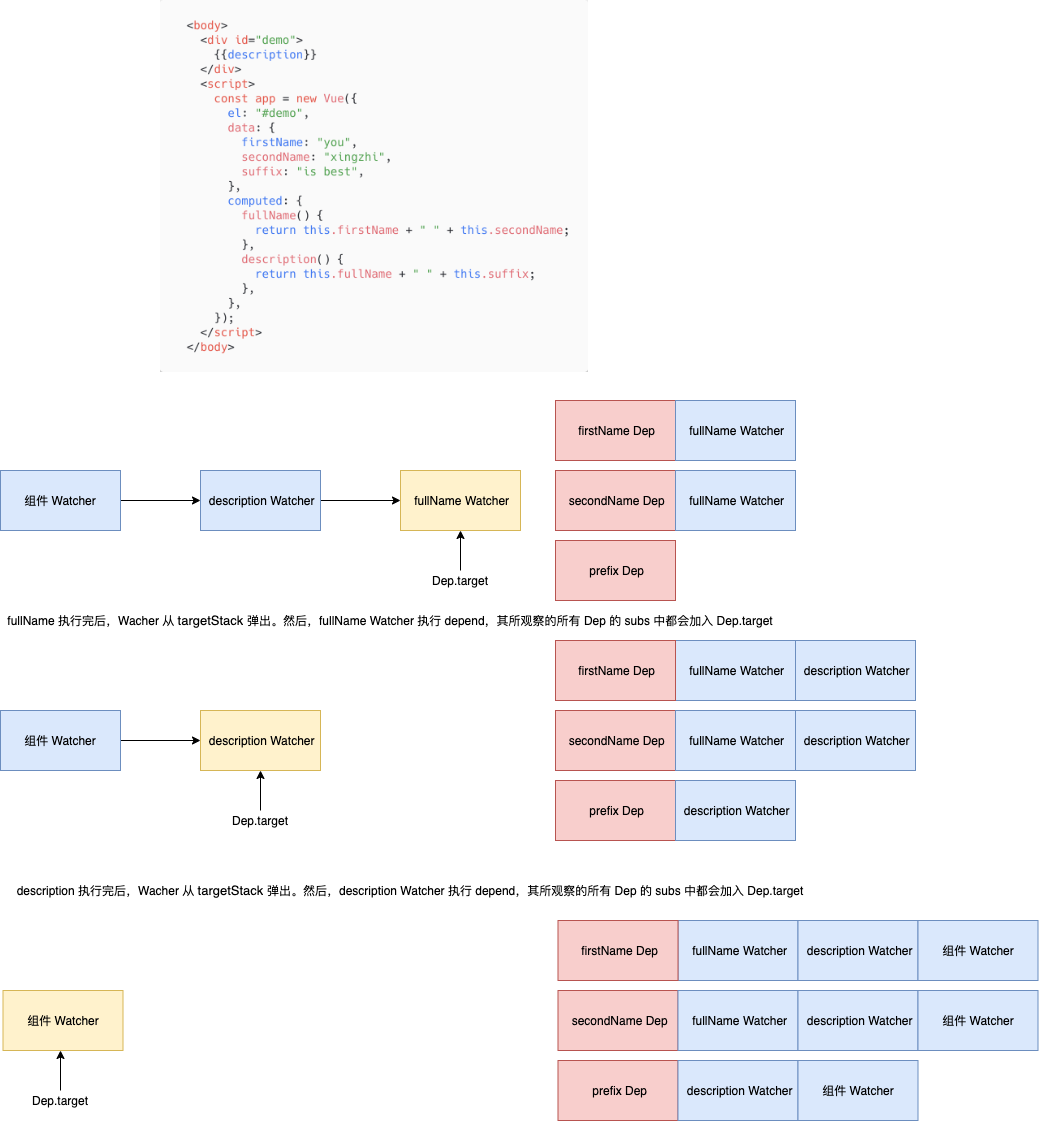
首次渲染的时候组件会实例化一个 Watcher 对象,会触发对 description 的求值,这里又会实例化一个 Watcher,而 description 中对 fullName 进行求值,又会实例化一个 Watcher。这样就形成了一个依赖栈,靠近栈底的元素会依赖其上面的元素。

当执行 fullName 的时候,由于其依赖了 firstNamesecondName,所以它会被添加进两者的 dep 中。收集完后会执行 popTarget(),此时 Dep.target 指向 descriptionWatcher,然后会执行 watcher.depend() 。注意这里的 watcher 还是 fullName 的,即 fullName 依赖啥,其他依赖 fullName 的也需要跟我有同样的依赖。举个例子:儿子依赖老爸,老爸是个啃老族依赖父母,所以孙子也间接依赖了爷爷奶奶。整下的就举一反三了。

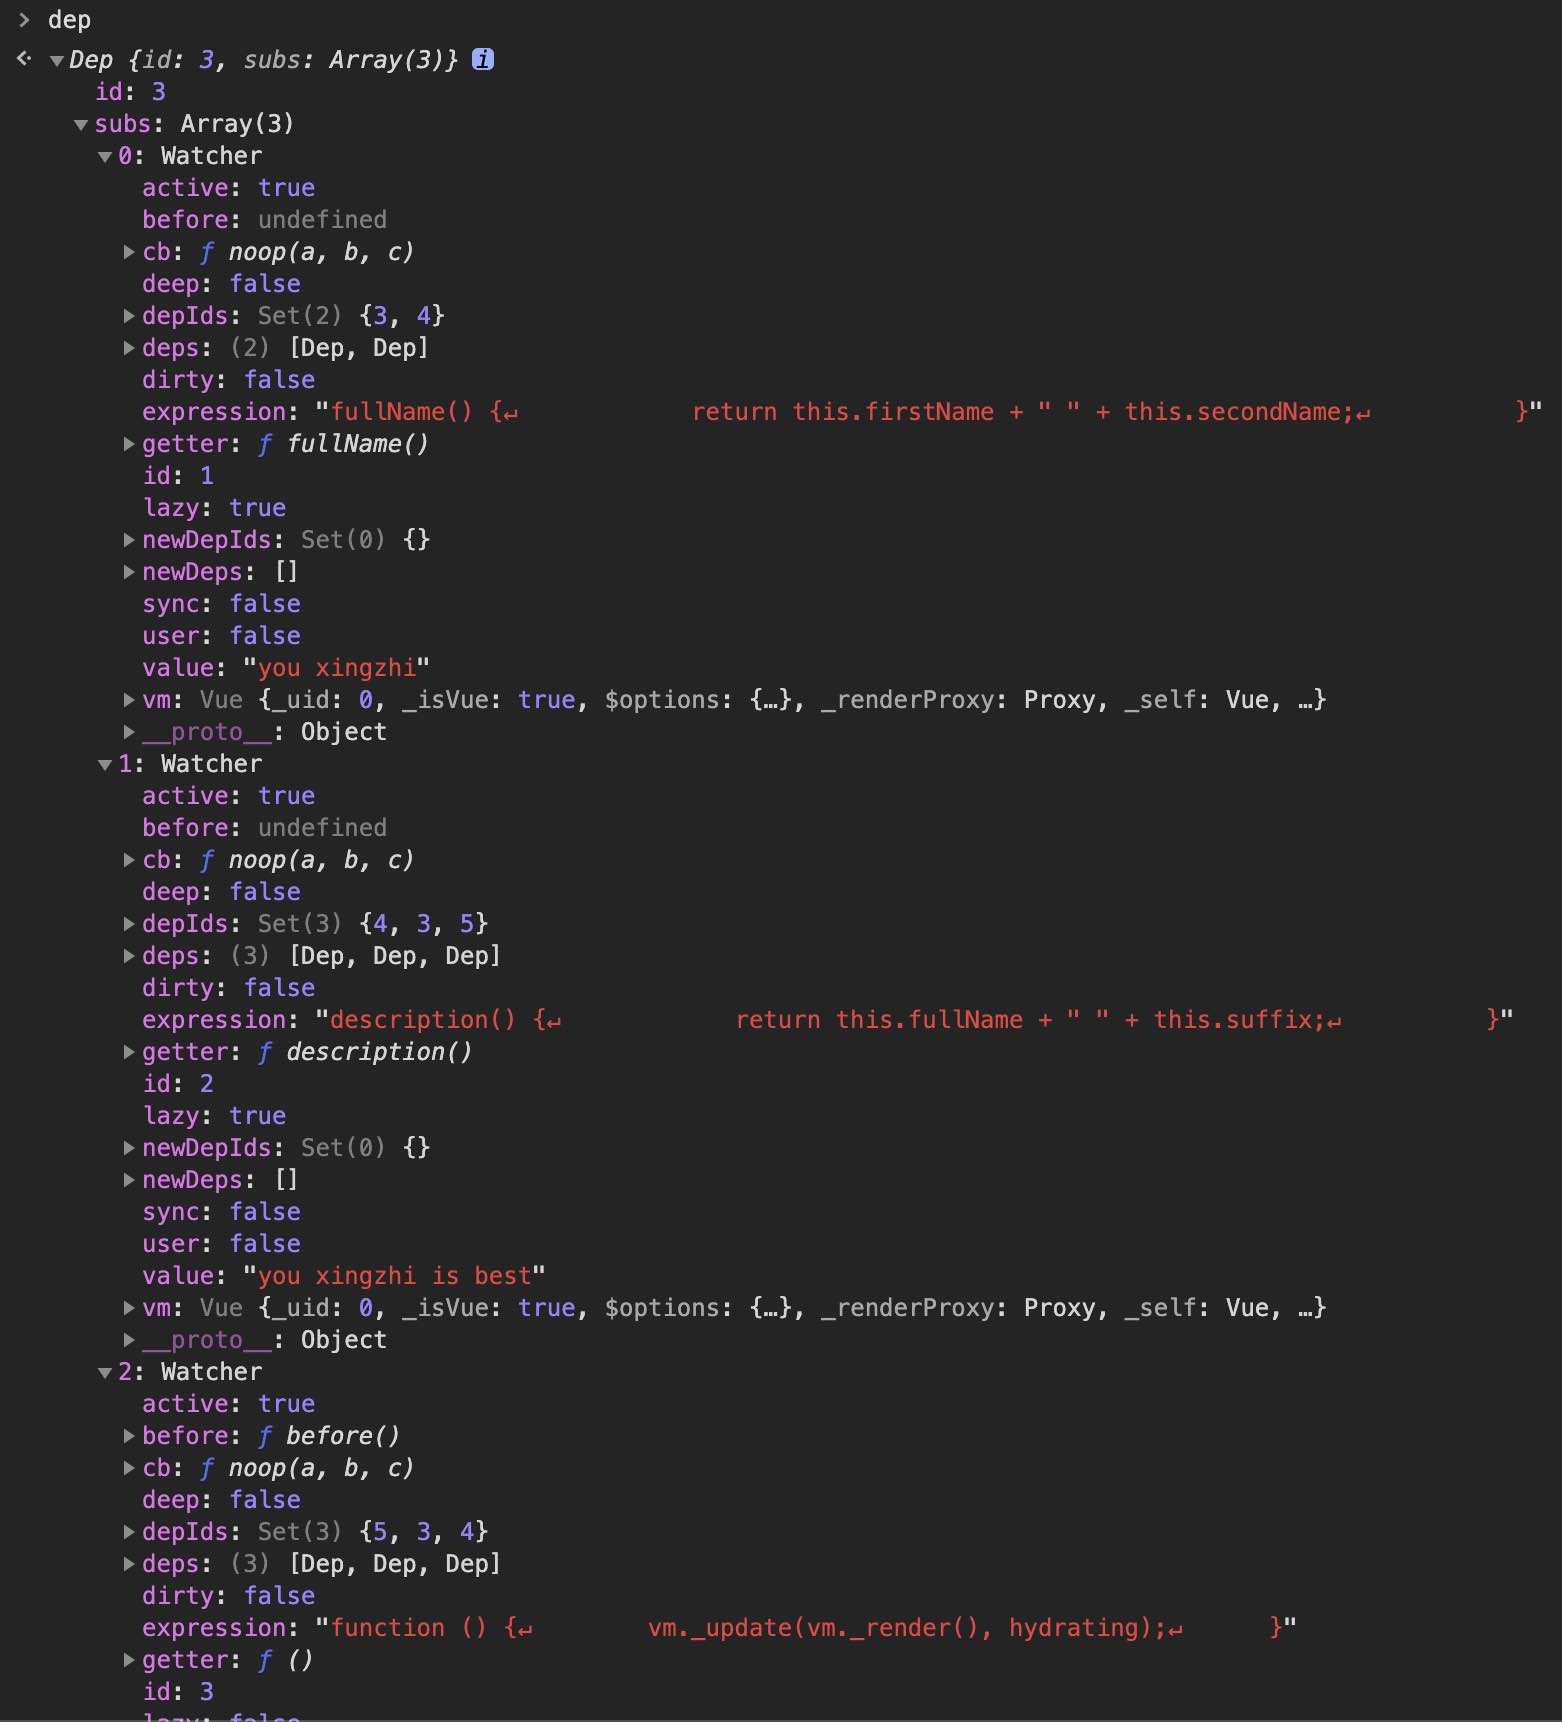
我们调试下代码,发现跟我们的分析是相符的: