前言
用过 Claude Code 的同学应该都注意到,它的终端界面相当精致——输入框、加载动画、对话气泡,甚至还有颜色高亮和布局对齐。第一次看到的时候我就在想:这是怎么做到的?
翻了下 Claude Code 的技术栈,发现它用的是一个叫 Ink 的库。Ink 的口号很简单:React for CLIs。没错,就是用写网页的那套 React 组件化思路,来构建命令行界面。
目前 Ink 在 GitHub 上有 36.7k stars,除了 Claude Code,Gemini CLI、GitHub Copilot CLI、Cloudflare Wrangler 都在用它。这篇文章就来看看 Ink 到底是什么,怎么用,以及它的核心原理是什么。
一、Ink 是什么
Ink 是一个 自定义 React 渲染器(Custom Renderer),它把 React 的组件模型移植到了命令行环境中。
普通的 React 渲染到 DOM,React Native 渲染到原生控件,而 Ink 渲染到终端的字符流。你写的每一个 <Box>、<Text> 组件,最终都会被转换成 ANSI 转义序列输出到 stdout。
什么是 ANSI 转义序列?简单说,终端本身只认纯文本,但如果你在文本里插入一些以
\x1b[(等价写法\033[)开头的特殊字符序列,终端就会把它们解释为”指令”而不是可见字符。所有你在终端里看到的颜色、粗体、光标移动,背后都是这套机制。
打开终端试试:
1 | # 红色文字 |

| 序列 | 含义 |
|---|---|
\033[31m |
红色前景 |
\033[32m |
绿色前景 |
\033[1m |
粗体 |
\033[4m |
下划线 |
\033[0m |
重置所有样式 |
\033[{n}A |
光标上移 n 行 |
\033[{n}C |
光标右移 n 列 |
有了颜色和光标控制,就可以”画”出带边框的 Box 了。用纯 printf 模拟一下 Ink 的 <Box borderStyle="round"> 效果:
1 | printf '\033[36m╭──────────────────╮\033[0m\n' |
终端输出:
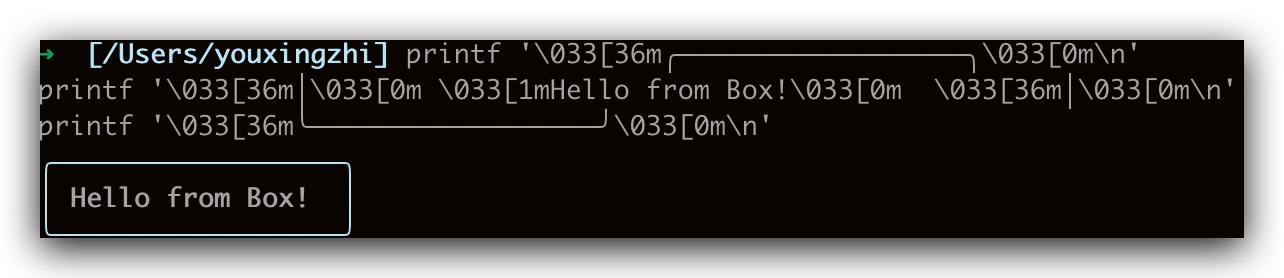
这就是 Ink 在做的事情的最底层——算好每个字符的坐标,拼上 ANSI 颜色码和 Unicode 制表符(╭╮╰╯│─),输出到 stdout。区别在于 Ink 让你用 React 组件声明式地描述 UI,它来帮你生成这些字符。
二、快速上手
安装:
1 | npm install ink react |
先上效果——一个实时更新的 Build Pipeline 进度看板:

核心代码:
1 | const Pipeline = () => { |
useState、useEffect 全部照用,<Box> 对标 <div>,Flexbox 布局直接搬过来,唯一的区别是渲染目标从浏览器 DOM 变成了终端字符流。
再来一个更好玩的——终端贪吃蛇:
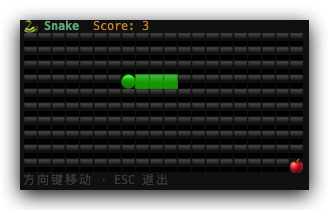
1 | const Snake = () => { |
整个游戏的模式跟写 React 网页一模一样——useInput 处理输入,setInterval + setState 驱动帧更新,JSX 描述 UI。Ink 在底层把 emoji 网格转成 ANSI 字符串、原地刷新终端,上层代码完全不用管。
最后来个实用的——多选交互,Claude Code 里经常能看到这种:

1 | const OPTIONS = [ |
三个 useState:cursor 控制高亮行,selected(Set)存选中项,done 标记是否确认。渲染部分用 <Box borderStyle="round"> 画圆角边框,每行根据状态切换 ❯ / 空格、◼ / ◻、高亮 / 暗色——跟写 React 网页的 checkbox 列表没什么区别。
怎么跟实际 CLI 脚本结合呢?关键是 render() 返回的 waitUntilExit()——它是一个 Promise,在组件调用 exit() 时 resolve。所以主流程长这样:
1 | let userChoices: string[] = [] |
先用 Ink 做交互收集输入,exit() 后 Promise resolve,接着就是普通的 Node.js 逻辑了。
三、核心 API
3.1 <Text> 组件
<Text> 是 Ink 中输出文本的唯一方式,支持颜色、样式等属性:
1 | import {render, Text} from 'ink' |
颜色底层用的是 chalk,支持所有 chalk 格式:颜色名、hex、rgb 都可以。
注意:
<Text>内部只能嵌套文本节点或其他<Text>,不能放<Box>。
3.2 <Box> 与 Flexbox 布局
<Box> 是 Ink 的布局容器,对标 HTML 的 <div>。Ink 内置了 Yoga 这个 Flexbox 布局引擎(Facebook 开源,React Native 也在用),所以你可以直接用 CSS Flexbox 的思路写布局:
1 | import {render, Box, Text} from 'ink' |
常用的 Flexbox 属性(flexDirection、flexGrow、alignItems、justifyContent、gap、padding、margin、width、height)基本都支持。每个 <Box> 默认就是 display: flex。
3.3 常用 Hooks
useInput — 监听键盘输入:
1 | import {useInput, render, Text} from 'ink' |
useApp — 控制应用生命周期:
1 | import {useApp, render, Text} from 'ink' |
其他常用 Hook 还有:useStdin、useStdout、useWindowSize(监听终端窗口大小变化)、useFocus(焦点管理)等。
四、它是怎么工作的
这部分是源码层面的分析,看看 Ink 的核心架构。整体流程分四步:
1 | React 组件树 |
4.1 自定义 React Reconciler
Ink 的核心是 src/reconciler.ts,它用 react-reconciler 包实现了一个自定义渲染器:
1 | import createReconciler from 'react-reconciler' |
react-reconciler 是 React 官方提供的底层包,React DOM 和 React Native 都是基于它实现的。你只需要实现一套”宿主环境”的 API(怎么创建节点、怎么插入节点、怎么更新属性等),React 的 diff 和调度逻辑就全部复用了。
4.2 虚拟 DOM
Ink 有自己的一套虚拟 DOM,定义在 src/dom.ts:
1 | export type ElementNames = |
你写的 <Box> 对应 ink-box 节点,<Text> 对应 ink-text 节点。每个节点都挂了一个 Yoga 节点(yogaNode),这是 Flexbox 布局计算的基础。
4.3 Yoga 布局计算
Yoga 是 Facebook 开源的跨平台 Flexbox 实现,React Native 也用它。Ink 把每个 DOM 节点的 flexDirection、padding、width 等属性同步给对应的 Yoga 节点,然后调用 Yoga 的 calculateLayout() 来计算出每个节点的精确位置和尺寸。
这就是为什么你能在终端里用 CSS Flexbox 布局——本质上 Yoga 给你做了完整的盒模型计算。
4.4 渲染成字符串
布局算好之后,src/renderer.ts 把虚拟 DOM 树渲染成字符串:
1 | const renderer = (node: DOMElement): Result => { |
Output 是一个二维字符缓冲区,每个位置存一个字符(加上 ANSI 样式信息)。renderNodeToOutput 递归遍历节点树,根据 Yoga 计算好的坐标把每个节点的内容”画”到缓冲区里,最后一次性 flush 到终端。
比如你写 <Text color="red" bold>Error</Text>,最终输出到 stdout 的其实是:
1 | \x1b[1m\x1b[31mError\x1b[39m\x1b[22m |
拆开看:\x1b[1m(开启粗体)→ \x1b[31m(红色前景)→ Error(可见文字)→ \x1b[39m(重置前景色)→ \x1b[22m(关闭粗体)。终端收到这串字符后,就会渲染出红色加粗的 “Error”。Ink 底层用 chalk 来生成这些序列,开发者不需要手写。
再看一个带坐标和边框的例子。你写:
1 | <Box borderStyle='round' borderColor='cyan' width={12}> |
Yoga 算出:Box 在第 0 行第 0 列,宽 12 高 3;文本 “Hi Ink” 在第 1 行第 1 列(边框内 padding)。Ink 把它们”画”到二维缓冲区后,输出的 ANSI 序列大致是:
1 | \x1b[36m╭──────────╮\x1b[39m\n |
翻译成人话:
1 | 第 0 行: [青色]╭──────────╮[重置] |
每个字符的位置都由 Yoga 布局精确决定,颜色由 chalk 生成 ANSI 码包裹——这就是从 React 组件到终端像素的完整链路。
4.5 终端输出与更新
有了 ANSI 字符串,还需要解决一个问题:怎么”原地刷新”?普通的 console.log 只会不断往下追加,但 Ink 需要像浏览器一样在同一块区域反复重绘。
做法是利用 ANSI 的光标控制序列:每次重渲染时,先用 \x1b[{N}A(光标上移 N 行)+ \x1b[J(清除光标以下内容)抹掉上一帧,再输出新内容。这就是 log-update 的核心思路,Ink 在此基础上封装了自己的实现。
主类 src/ink.tsx 负责把以上所有环节串起来,同时处理:
- 终端窗口大小变化(重新计算布局)
- CI 环境检测(
is-in-ci,CI 里不刷新直接输出) - 信号处理(
signal-exit,优雅退出时恢复光标) - 无障碍支持(screen reader 输出)
五、总结
Ink 做的事情本质上是:把 React 的组件模型接到终端这个”宿主环境”上。技术上,它实现了一个自定义 React Reconciler,把 React 组件树翻译成内部虚拟 DOM,再用 Yoga 做 Flexbox 布局计算,最终渲染成 ANSI 字符串输出到终端。
它适合什么场景?
- 交互式 CLI 工具(带输入、菜单、进度条)
- 需要复杂布局的终端 UI(多列、嵌套)
- 团队已经熟悉 React,希望复用同一套思维模型
和传统 CLI 库(chalk + inquirer)相比,Ink 的优势是组件化和状态管理——UI 逻辑和状态都在组件里,复杂界面拆成小组件,比一堆命令式代码好维护得多。代价是有一定的学习曲线,以及 Node.js 里跑 React 的额外开销。
如果你要写一个功能简单的 CLI,chalk + inquirer 够用。但如果你在做 Claude Code 这种复杂的交互式工具,Ink 几乎是目前最好的选择。