Nest.js 微服务实战之用户认证(使用 JWT)

前言

上篇文章搭建好了我们的微服务系统框架,今天我们来把用户认证加上。

用户认证流程

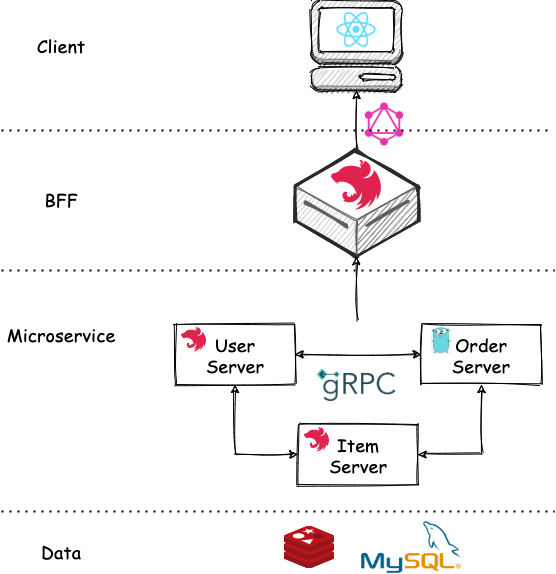
首先,我们添加一个 User Server 的微服务,则我们的架构演变成这样:

我们使用 JWT 来进行用户认证,首先是登录过程。

登录过程

登录过程很简单,如下所示:

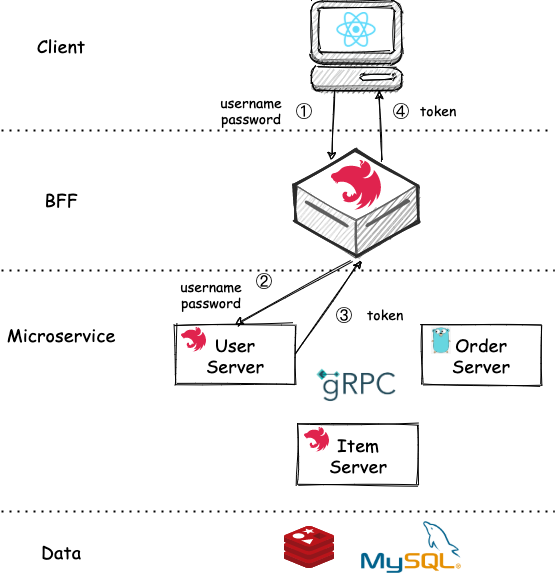
用户在 Client 输入账号和密码,BFF 层负责转发到 User Server,User Server 返回 token 给 BFF,BFF 再转发给 Client 即可。

之后,Client 的请求都需要带上 token 来进行认证

认证过程

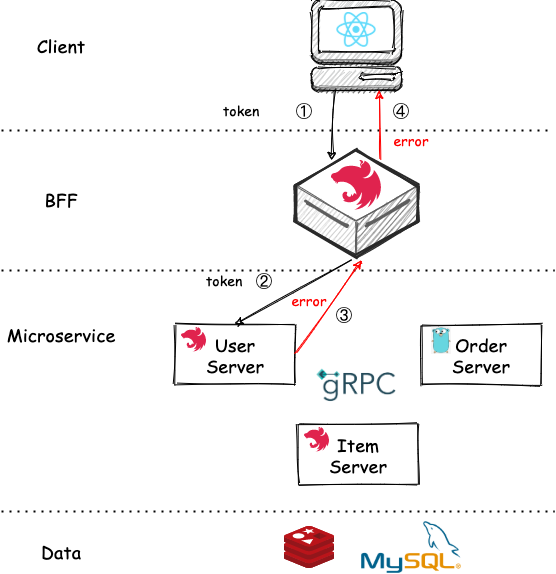
认证过程步骤相对要多一点,比如现在要获取某个用户下的某个订单,则 BFF 需要先调用 User Server 来进行认证,如果成功会返回用户信息,然后再连同订单 ID 一起传递给 Order Server 获取订单:

如果认证失败,则 BFF 直接返回错误:

接下来,看看关键部分的代码是怎么实现的。

关键代码

在 Nest.js 中,用户认证一般可以通过 Guard 来实现,比如上面的功能就可以写成这样:

1
2
3
4
5
6
7
8
9
10
11
12
13
14
15
16
17
18
19
export class JwtAuthGuard implements CanActivate {
constructor(private readonly userService: UserService) {}
async canActivate(context: ExecutionContext): Promise<boolean> {
const ctx = GqlExecutionContext.create(context)
const req = ctx.getContext().res.req
const headers = req.headers
if (!headers.authorization) return false
const token = headers.authorization.split(' ')[1]
try {
const user = await this.userService.verify(token)
if (user) {
req.user = user
return true
}
} catch (error) {
return false
}
}
}

在 Order Server 的 resolver 中可以像这样来使用:

1
2
3
4
5
6
7
8
9
10
11
12
13
14
15
16
17
@Resolver(() => Order)
@UseGuards(JwtAuthGuard)
export class OrderResolver {
constructor(
private readonly orderService: OrderService,
private readonly itemService: ItemService
) {}

@Query(() => Order)
async order(
@Args('id', {type: () => ID}) id: number,
@CurrentUser() user: User
) {
const order = await this.orderService.findOne(id)
return order
}
}

其中,CurrentUser 是自定义的一个装饰器,当认证成功时从 request 里面获取 user

1
2
3
4
5
6
7
8
9
10
import {createParamDecorator, ExecutionContext} from '@nestjs/common'
import {GqlExecutionContext} from '@nestjs/graphql'

export const CurrentUser = createParamDecorator(
(data, context: ExecutionContext) => {
const ctx = GqlExecutionContext.create(context)
const req = ctx.getContext().res.req
return req.user
}
)

接下来,我们来看看客户端要怎么做。

首先,我们开发一个登录的页面:

1
2
3
4
5
6
7
8
9
10
11
12
13
14
15
16
17
18
19
20
21
22
23
24
25
26
27
28
29
30
function Login() {
const [login, {data, loading, error}] = useMutation<
{login: string},
LoginParam
>(
gql`
mutation LoginMutation($username: String!, $password: String!) {
login(username: $username, password: $password)
}
`
)

const onFinish = async (values: LoginParam) => {
const {data} = await login({variables: values})
if (data?.login) localStorage.setItem('token', data.login)
}

return (
<Form
name='form'
onFinish={onFinish}
footer={
<Button block type='submit' color='primary' size='large'>
提交
</Button>
}>
...
</Form>
)
}

这里使用的是 GraphQL 中的 mutation 来进行登录,则 User Server 中的 resolver 也要改一下:

1
2
3
@Mutation(() => String)
async login(
...

登录完成后,我们把 token 存在 localStorage 中。接下来要做的就是让请求的时候头部带上这个 token,这个通过 @apollo/clientlink 来实现:

1
2
3
4
5
6
7
8
9
10
11
12
13
14
15
16
17
18
19
const httpLink = createHttpLink({
uri: '/graphql',
})

const authLink = setContext((_, {headers}) => {
const token = localStorage.getItem('token')

return {
headers: {
...headers,
authorization: token ? `Bearer ${token}` : '',
},
}
})

const client = new ApolloClient({
link: authLink.concat(httpLink),
cache: new InMemoryCache(),
})

到此,用户认证就基本完成了,完整代码见这里