Nest.js 微服务实战之搭建系统框架(基于 GraphQL 和 RPC)

前言

Nest.js 微服务实战系列计划实现一个简单的基于微服务的系统(TaoLJ),系统架构如下:

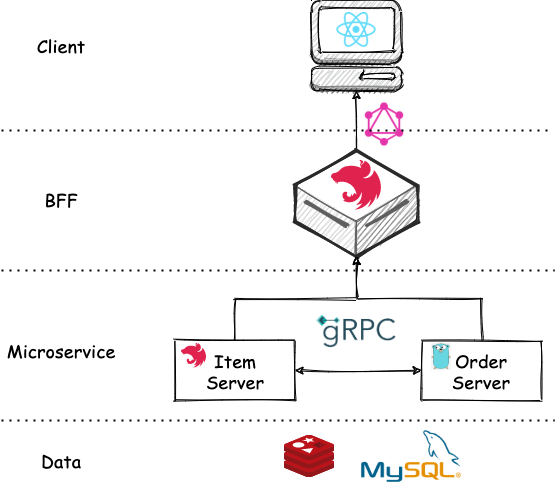
系统分为 Client,BFF(Backend For Frontend),Microservice,Data 四层。Client 使用 React 实现,与 BFF 通过 GraphQL 通信。BFF 使用 Nest.js 搭建,与 Microservice 之间通过 gRPC 通信。系统包含两个微服务 Item Server 和 Order Server,分别用 Node.js(Nest.js 框架) 和 Golang 来编写,微服务之间也通过 gRPC 通信。数据层就使用最常用的 MySQL 和 Redis。

本篇是 Nest.js 微服务实战的第一篇,搭建系统框架。

你也可以直接查看代码

搭建 RPC 微服务

首先规划一下我们的目录结构:

1
2
3
4
5
6
.
├── bff
├── for-debug // 用来调试的客户端,可以连接 BFF 和 Microservice
├── item-server
├── order-server
└── proto // 用来放 gRPC 需要用到的 proto 文件

由于 proto 文件需要被客户端和服务端共享,所以这里单独拿出来作为一个目录。接下来,先来搭建 Item Server。

Nest.js 搭建 Item Server 微服务

首先,我们在 proto 目录下新建 item.proto

1
2
3
4
5
6
7
8
9
10
11
12
13
14
15
16
17
18
19
20
21
22
23
24
syntax = "proto3";

package item;

import "common.proto";

service ItemService {
rpc FindOne (ItemById) returns (Item) {}
rpc GetItems (common.Pagination) returns (Items) {}
}

message ItemById {
int32 id = 1;
}

message Item {
int32 id = 1;
string name = 2;
string url = 3;
}

message Items {
repeated Item list = 1;
}

然后,参考官网 gRPC 搭建出项目结构,如下所示:

1
2
3
4
5
6
7
.
├── src
├── app.module.ts
├── gen-code // 存放通过 proto 文件生成的代码
├── item.controller.ts
├── item.service.ts
└── main.ts

其中 gen-code 用于存放通过 proto 文件生成的代码,那接下来就是生成代码。

需要先安装如下工具:

protoc:用来编译 proto 文件到代码的工具,本文使用 brew 安装,其他平台可自行搜索相关方式。
ts-protoprotoc 的插件,用来生成 TS 代码

之后,在 item-server 目录下执行如下命令:

1
protoc --plugin=./node_modules/.bin/protoc-gen-ts_proto --ts_proto_out=./src/gen-code --ts_proto_opt=nestJs=true --proto_path=../proto item.proto

即可生成 Nest.js 风格的代码:

1
2
3
4
.
├── gen-code
│ ├── common.ts
│ └── item.ts

接着,我们需要按照 proto 文件中的定义实现我们的 controller

1
2
3
4
5
6
7
8
9
10
11
12
13
14
15
16
17
18
19
20
21
22
23
24
25
26
27
28
29
30
31
32
33
import {Controller} from '@nestjs/common'
import {Pagination} from './gen-code/common'
import {
Item,
Items,
ItemServiceController,
ItemServiceControllerMethods,
} from './gen-code/item'
import {ItemById} from './gen-code/item'

const items = [
{
id: 1,
name: 'Banana Peel',
url: 'https://images.indianexpress.com/2021/10/banana-peel-1200.jpg',
},
{
id: 2,
name: 'Waste Paper',
url: 'https://www.wpt-nl.com/images/module_image/img1_800_600_1593777835.jpg',
},
]

@Controller('item')
@ItemServiceControllerMethods()
export class ItemController implements ItemServiceController {
getItems(request: Pagination): Items {
return {list: items}
}
findOne(data: ItemById): Item {
return items.find(({id}) => id === data.id)
}
}

这样,Item Server RPC 服务算是搭建好了,我们写一个客户端来测试一下:

1
2
3
4
5
6
7
8
9
10
11
12
13
14
15
16
17
18
19
20
21
22
23
24
25
26
27
const path = require('path')

const PROTO_PATH = path.resolve(__dirname, '../proto/item.proto')

const grpc = require('@grpc/grpc-js')
const protoLoader = require('@grpc/proto-loader')
const packageDefinition = protoLoader.loadSync(PROTO_PATH, {
keepCase: true,
longs: String,
enums: String,
defaults: true,
oneofs: true,
})
const item = grpc.loadPackageDefinition(packageDefinition).item

const clientItem = new item.ItemService(
'localhost:9001',
grpc.credentials.createInsecure()
)

clientItem.findOne({id: 1}, function (err, response) {
console.log('findOne: ', response)
})

clientItem.getItems({page: 1, pageSize: 10}, function (err, response) {
console.log('getItems: ', response)
})

验证无误,继续搭建 Order Server RPC 服务。

Golang 搭建 Order Server 微服务

本文 Golang 版本为 1.19

首先同样在 proto 目录下新建 order.proto,这里就不贴代码了。

然后,在 order-server 目录下执行:

1
2
3
protoc --go_out=./pb --go_opt=paths=source_relative --proto_path={Your path here}/proto \
--go-grpc_out=./pb --go-grpc_opt=paths=source_relative \
order.proto common.proto

则会生成 Golang 所需的代码:

1
2
3
4
5
.
├── pb
│ ├── common.pb.go
│ ├── order.pb.go
│ └── order_grpc.pb.go

然后,编写我们的服务端代码:

1
2
3
4
5
6
7
8
9
10
11
12
13
14
15
16
17
18
19
20
21
22
23
24
25
26
27
28
29
30
31
32
33
package main

import (
"context"
"log"
"net"
"order-server/pb"
"time"

"google.golang.org/grpc"
)

const PORT = "9002"

type Server struct {
pb.UnimplementedOrderServiceServer
}

func (s *Server) FindOne(ctx context.Context, params *pb.OrderById) (*pb.Order, error) {
order := &pb.Order{Id: 1, Price: 99.9, CreateTime: time.Now().Unix(), ItemIds: []int32{1, 2}}
return order, nil
}

func main() {
server := grpc.NewServer()
pb.RegisterOrderServiceServer(server, &Server{})

lis, err := net.Listen("tcp", ":"+PORT)
if err != nil {
log.Fatalf("net.Listen err: %v", err)
}
server.Serve(lis)
}

这样,我们的 Golang RPC 服务端就搭好了。客户端则同上文类似,换一下 proto 文件和端口号即可。

搭建 BFF 服务

为了更好的理解 GraphQL,我们先用纯 Node.js 搭建一遍,然后再使用 Nest.js 实现一遍。

Node.js 版

一个简单的基于 express 的 GraphQL 服务如下:

1
2
3
4
5
6
7
8
9
10
11
12
13
14
15
16
17
18
19
const express = require('express')
const {graphqlHTTP} = require('express-graphql')

const schema = require('./schema')

const app = express()
const PORT = 4000

app.use(
'/graphql',
graphqlHTTP({
schema,
graphiql: true,
})
)

app.listen(PORT, () => {
console.log(`Graph QL API is up and running on Port ${PORT}`)
})

显然,这里最重要的是 schema.js 这个文件:

1
2
3
4
5
6
7
8
9
10
11
12
13
14
15
16
17
18
19
20
21
22
23
24
25
26
27
28
29
30
31
32
33
34
35
36
37
38
39
40
41
42
const Item = new GraphQLObjectType({
name: 'item',
fields: {
id: {
type: GraphQLInt,
},
name: {
type: GraphQLString,
},
},
})

const RootQueries = new GraphQLObjectType({
name: 'rootQuery',
fields: {
items: {
type: new GraphQLList(Item),
args: {
page: {
type: GraphQLInt,
},
pageSize: {
type: GraphQLInt,
},
},
resolve: async (_, args, a, b) => {
return new Promise((resolve, reject) => {
clientItem.getItems({page: 1, pageSize: 1}, (err, rsp) => {
resolve((rsp && rsp.list) || [])
})
})
},
},
},
})

const schema = new GraphQLSchema({
query: RootQueries,
types: [Item, Order],
})

module.exports = schema

该文件中定义了实体模型 Item 以及我们的 RootQueries。这里的 RootQueries 可以看成我们的接口定义,但其实它也只是一个 Object Type 而已,她每一个 Field 都实现了一个 resolve,该函数的返回值就是这个字段的值。

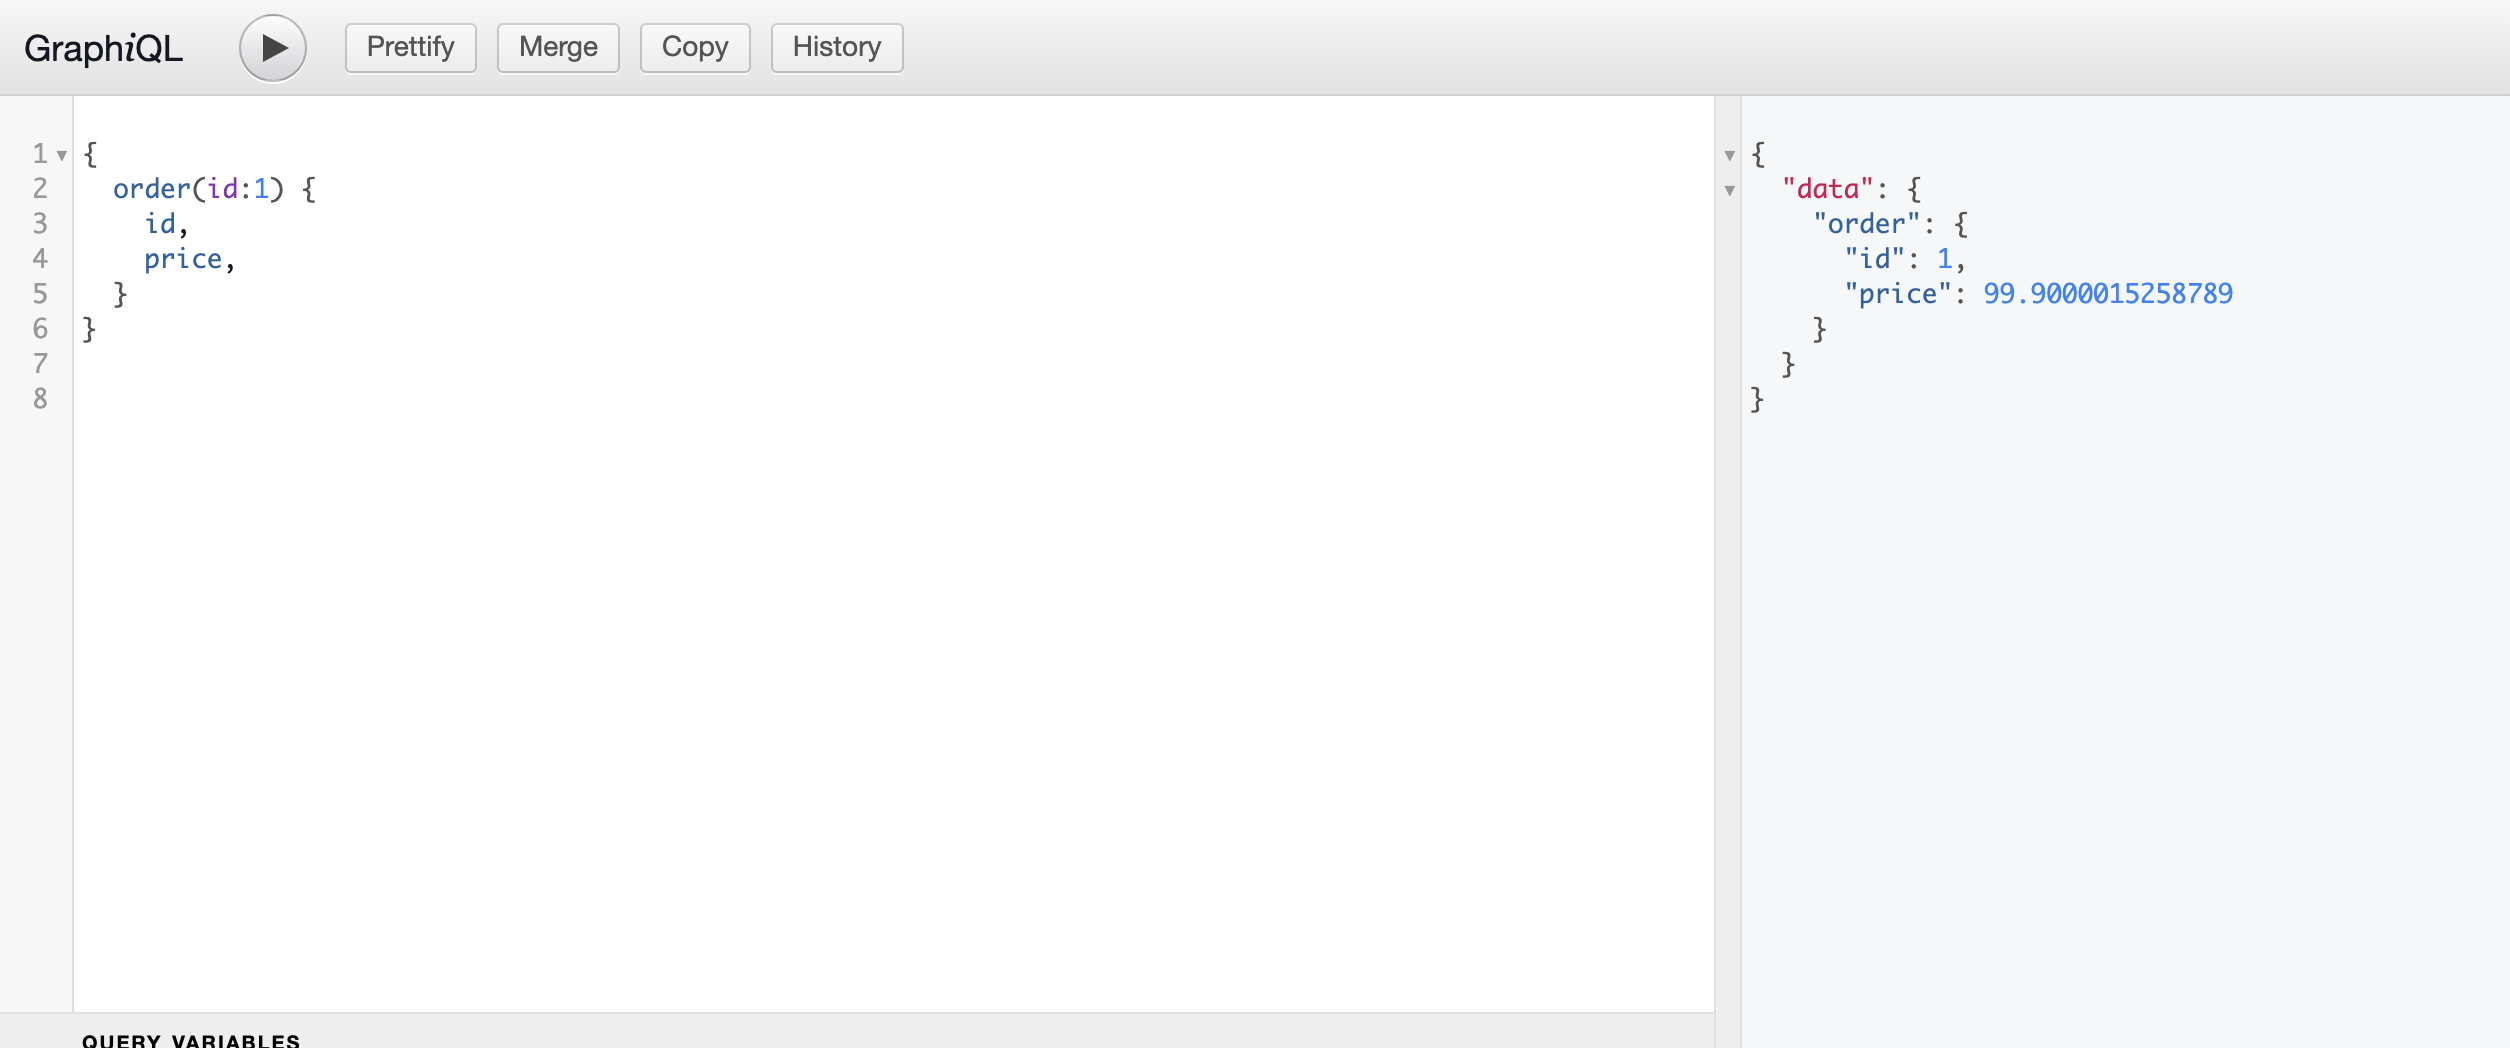
启动客户端,在浏览器中打开 http://localhost:4000/graphql 就可以体验了:

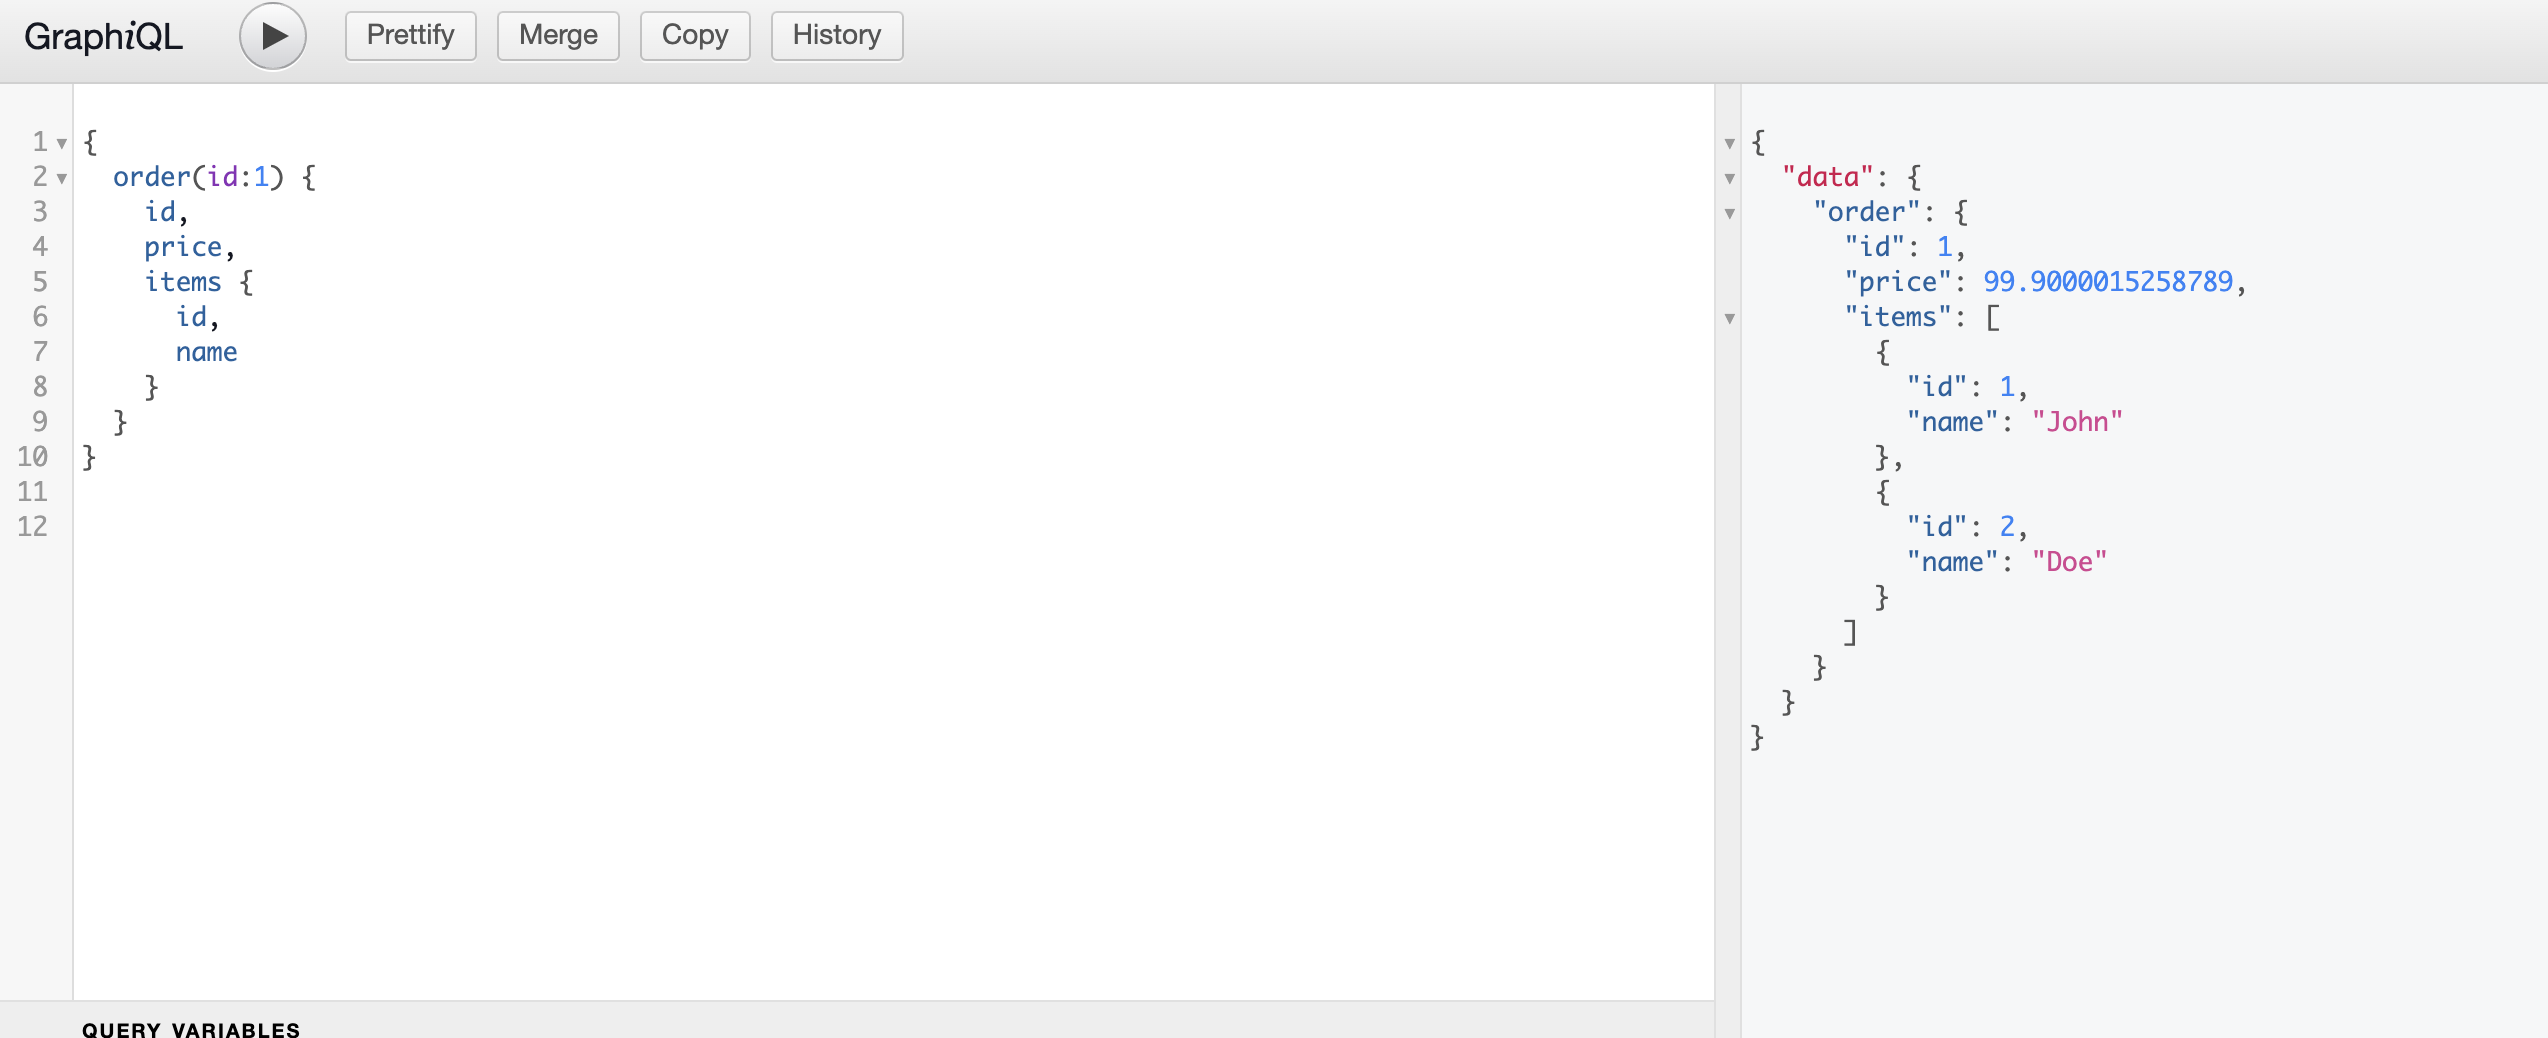
GraphQL 的一大魅力在于客户端可以自由定义返回的字段,我们用另一个例子更好的体会一下:

1
2
3
4
5
6
7
8
9
10
11
12
13
14
15
16
17
18
19
20
21
22
23
24
25
26
27
28
29
30
31
32
33
34
35
36
37
38
39
40
41
42
43
const RootQueries = new GraphQLObjectType({
name: 'rootQuery',
fields: {
order: {
type: Order,
args: {
id: {
type: GraphQLInt,
},
},
resolve: async (root, args, context, info) => {
const fields = graphqlFields(info)
console.log(fields)
return new Promise((resolve) => {
let order
clientOrder.findOne(args, async (err, rsp) => {
order = rsp
// If client needs items
if (fields.hasOwnProperty('items')) {
const promises = []
// Get items info of an order
for (let i = 0; i < rsp.itemIds.length; i++) {
const itemId = rsp.itemIds[i]
promises.push(
new Promise((resolve) => {
clientItem.findOne({id: itemId}, (err, rsp) => {
resolve(rsp)
})
})
)
}
const items = await Promise.all(promises)
order.items = items
resolve(order)
return
}
resolve(order)
})
})
},
},
},
})

上面的例子用来查询一个 Order,当客户端没有指定返回 items 字段时,只调用 Order Server 的接口即可。否则需要调用 Item Server 的接口。


接下来看看使用 Nest.js 如何实现相同的功能。

Nest.js 版

Nest.js 官网 中搭建 GraphQL 服务有 Code First 和 Schema First 两种方式,我们这里选择 Code First 方式,即自己定义 TS 的对象模型,然后自动生成 schema。

首先,我们定义 Item 和 Order 两个模型:

1
2
3
4
5
6
7
8
9
10
11
12
13
14
15
16
17
18
19
20
21
22
23
24
25
26
27
28
import {Field, ID, ObjectType, Float, Int} from '@nestjs/graphql'

@ObjectType({description: 'item'})
export class Item {
@Field(() => ID)
id: number

@Field()
name: string

@Field()
url: string
}

@ObjectType({description: 'order'})
export class Order {
@Field(() => ID)
id: number

@Field(() => Float)
price: number

@Field(() => Int)
createTime: number

@Field(() => [Item])
items?: Item[]
}

然后编写业务逻辑相关的部分,这里以 Item 这个模块为例,每个模块包含 module, resolver, service 三个文件:

1
2
3
4
.
├── item.module.ts // 模块入口
├── item.resolver.ts // 请求的接入点,类似 http 服务的 controller,一般在这里做参数处理等事情,会调用 service 中的方法
└── item.service.ts // 具体的业务逻辑

其中 item.resolver.tsitem.service.ts 如下:

1
2
3
4
5
6
7
8
9
10
11
12
13
14
15
16
17
18
19
20
21
22
23
24
25
26
27
28
29
30
31
32
33
34
35
36
37
38
// item.resolver.ts
@Resolver(() => Item)
export class ItemResolver {
constructor(private readonly itemService: ItemService) {}

@Query(() => Item)
async item(@Args('id', { type: () => ID }) id: number) {
return this.itemService.findOne(id);
}

@Query(() => [Item])
async items(
@Args('page', { type: () => Int }) page: number,
@Args('pageSize', { type: () => Int }) pageSize: number,
) {
const items = await this.itemService.getItems(page, pageSize);
return items;
}
}

// item.service.ts
@Injectable()
export class ItemService {
constructor(private rpcService: RPCService) {}

async findOne(id: number): Promise<Item> {
return await lastValueFrom(
this.rpcService.itemServiceClient.findOne({ id }),
);
}

async getItems(page: number, pageSize: number): Promise<Item[]> {
const items = await lastValueFrom(
this.rpcService.itemServiceClient.getItems({ page, pageSize }),
);
return items.list;
}
}

其中的 rpcService 来自 rpc 这个模块,这里会初始化对接 item-server 和 order-server 的 RPC 客户端 itemServiceClientorderServiceClient,代码就不贴了,直接看 Github 吧。

GraphQL 只是一个协议,最后还是需要一个网络服务来驱动,Nest.js 官网提供了 @nestjs/apollo@nestjs/mercurius 两种,我们这里选择使用 express-graphql 来自定义:

1
2
3
4
5
6
7
8
9
10
11
12
13
14
15
16
17
18
19
20
21
22
23
24
25
26
27
28
29
class ExpressGraphQLDriver extends AbstractGraphQLDriver {
async stop(): Promise<void> {
console.log('stop')
}
async start(options: GqlModuleOptions<any>): Promise<void> {
options = await this.graphQlFactory.mergeWithSchema(options)
const {httpAdapter} = this.httpAdapterHost
httpAdapter.use(
'/graphql',
graphqlHTTP({
schema: options.schema,
graphiql: true,
})
)
}
}

@Module({
imports: [
RPCModule,
ItemModule,
OrderModule,
GraphQLModule.forRoot({
driver: ExpressGraphQLDriver,
autoSchemaFile: 'schema.gql',
}),
],
})
export class AppModule {}

一切就绪后打开 http://localhost:9000/graphql 即可跟上面一样进行调试。

Client

最后,让我们来基于 React 写个简单的客户端,其中 GraphQL 客户端使用 @appollo/client 这个库,需要在入口进行配置:

1
2
3
4
5
6
7
8
9
10
11
12
13
14
15
import {ApolloClient, InMemoryCache, ApolloProvider, gql} from '@apollo/client'


const client = new ApolloClient({
uri: '/graphql',
cache: new InMemoryCache(),
})

ReactDOM.createRoot(document.getElementById('root') as HTMLElement).render(
<React.StrictMode>
<ApolloProvider client={client}>
<App />
</ApolloProvider>
</React.StrictMode>
)

组件中,按照如下方式使用即可:

1
2
3
4
5
6
7
8
9
10
11
12
13
14
15
16
17
18
19
20
21

function App() {
const {loading, error, data} = useQuery<{items: Item[]}>(
gql`
{
items(page: 1, pageSize: 1) {
id
name
url
}
}
`
)

if (loading) return <p>Loading...</p>
if (error) return <p>Error : {error.message}</p>

return (
...
)
}

所有服务都启动好以后,打开我们的客户端,就可以看到我们系统的雏形了:

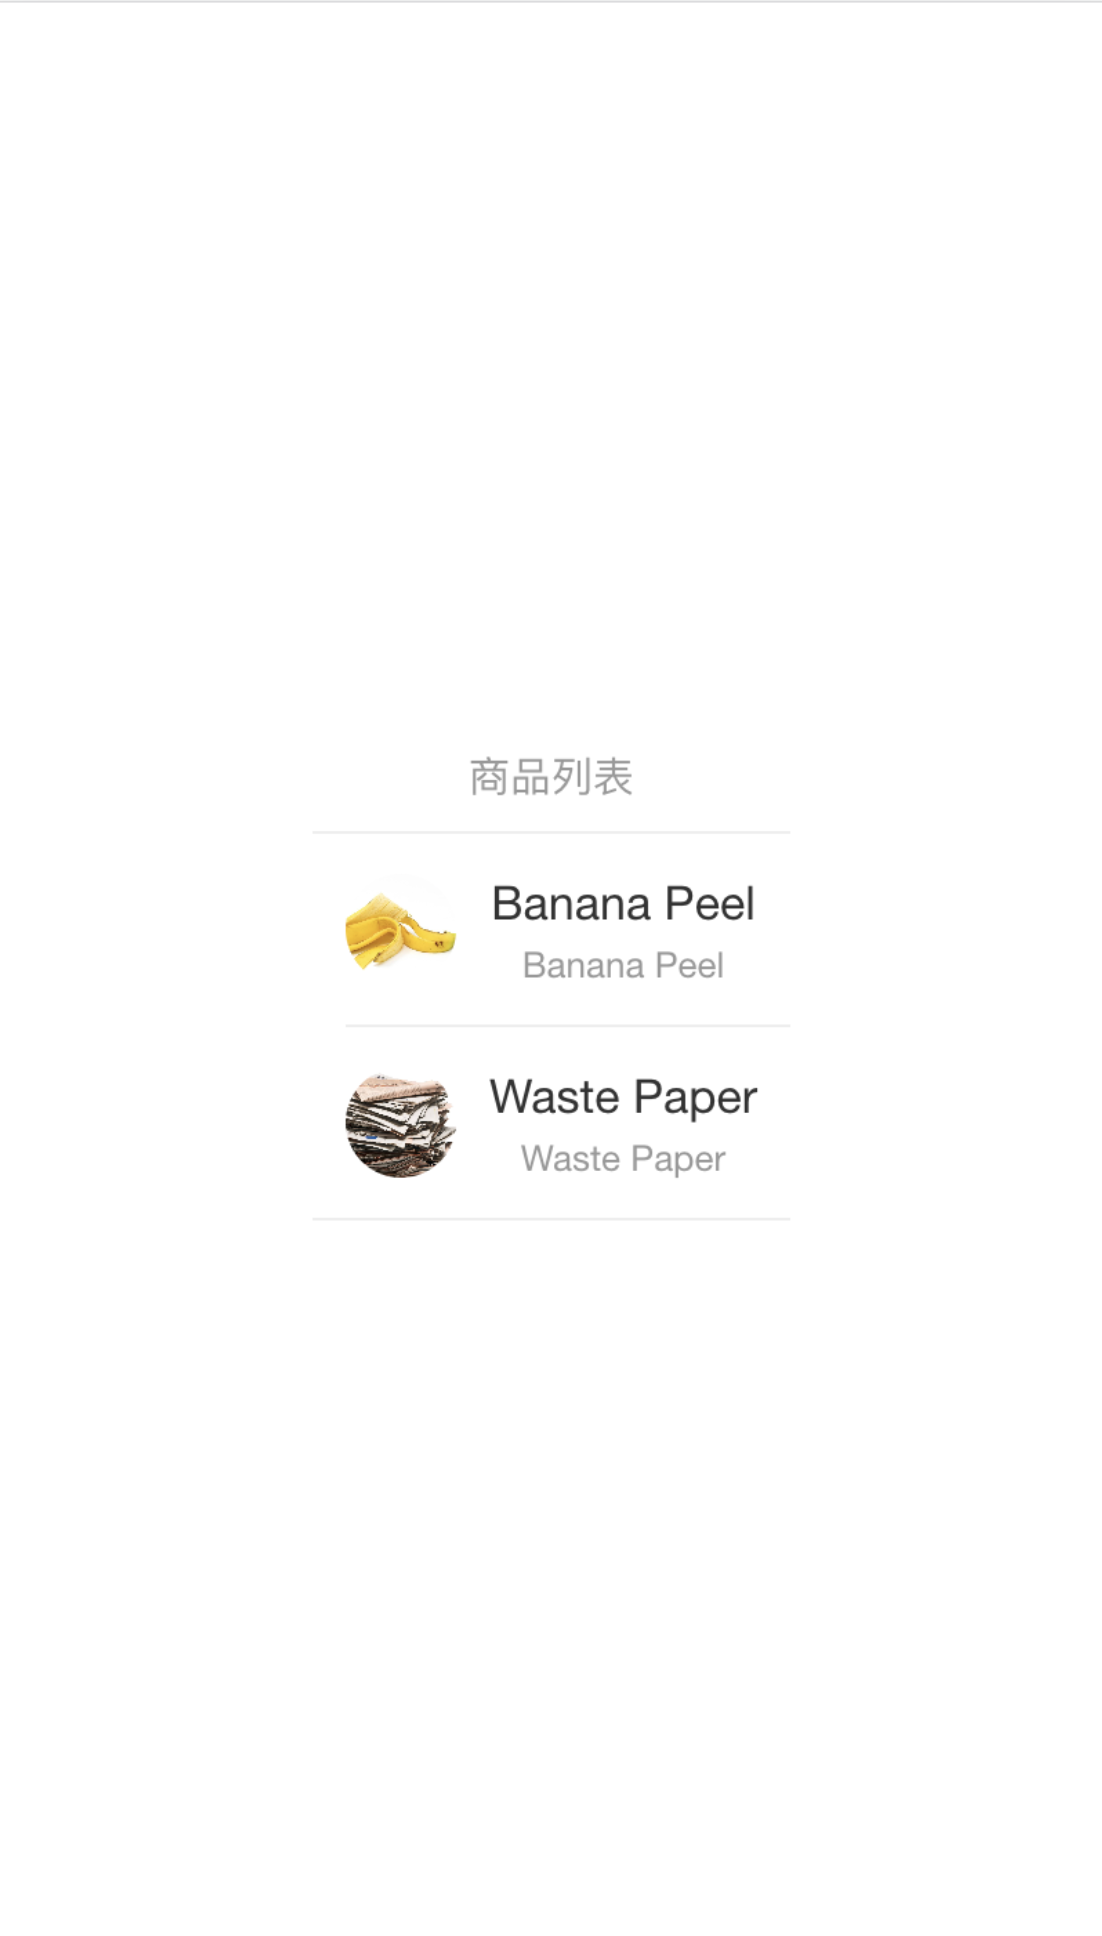
终于赶在过年前把系统雏形打好了,接下来的计划是什么呢?当然是过年了!